The Best Containers for Meal Prep That Keep Food Fresh for 7 Days
You spend two hours on Sunday cooking a week’s worth of healthy meals. By Wednesday, everything smells off and you’re back to takeout. Sound familiar? The problem isn’t your cooking skills or your meal choices. It’s the containers you’re storing them in.
The best meal prep containers combine airtight seals, BPA-free materials, and proper portion sizes to keep food fresh for seven days. Glass containers offer superior freshness and reheating, while quality plastic options provide lightweight portability. Choose compartmented designs for macro tracking and leak-proof lids for sauce-heavy meals. Proper container selection prevents food waste, saves money, and makes sticking to your nutrition plan significantly easier throughout the week.
What Makes a Container Actually Keep Food Fresh
Not all containers are created equal. The difference between food that lasts seven days and food that goes bad in three comes down to three critical factors.
Air exposure is your biggest enemy. When oxygen reaches your food, it speeds up bacterial growth and oxidation. That’s why your chicken turns gray and your salads get slimy.
Temperature consistency matters just as much. Containers that don’t seal properly let warm air in every time you open your fridge. This temperature fluctuation creates condensation inside the container, which breeds bacteria.
Material quality affects everything from how well the seal works to whether chemicals leach into your food. Cheap containers often warp in the microwave or dishwasher, compromising the seal after just a few uses.
The seal is everything. I’ve tested hundreds of containers in my kitchen, and the ones that keep food fresh longest all have one thing in common: a four-sided locking mechanism that creates a complete airtight seal around the entire lid perimeter.
Glass Versus Plastic for Meal Prep Success
This debate splits the meal prep community right down the middle. Both have legitimate advantages depending on your lifestyle.
Glass containers win for food safety and longevity. They don’t absorb odors, stains, or flavors. Your curry won’t make your containers orange, and your garlic chicken won’t make everything else taste like garlic.
Glass also heats more evenly in the microwave. No more cold spots in the center of your rice while the edges are burning hot. You can also move glass containers straight from freezer to oven, which is perfect for prepping freezer meals.
The downside? Weight. Carrying five glass containers in your work bag gets old fast. They’re also more expensive upfront and can shatter if dropped.
Quality plastic containers offer portability without sacrificing freshness. Look for containers marked BPA-free, microwave-safe, and dishwasher-safe on the top rack. The best plastic options use polypropylene, which holds up better than cheaper alternatives.
Plastic works well for foods you’ll eat within five days. For anything you plan to store longer, glass provides better protection against freezer burn and odor transfer.
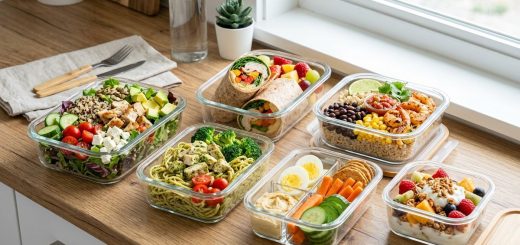
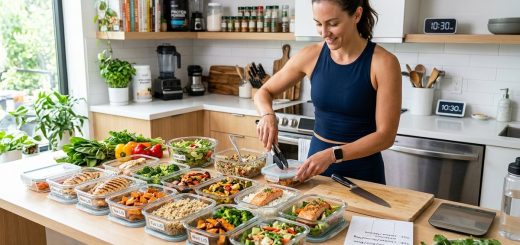
Container Sizes That Actually Match Real Portions
Most people buy containers that are either too small or way too big. Getting the size right prevents food waste and helps with portion control.
Here’s what works for different meal types:
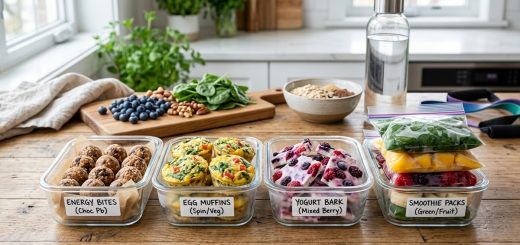
- 32 oz containers: Perfect for full meals with protein, carbs, and vegetables
- 24 oz containers: Ideal for lighter lunches or dinners without heavy starches
- 16 oz containers: Great for high-protein breakfasts or side salads
- 8 oz containers: Best for snacks, dressings, or individual portions of nuts and fruit
- 4 oz containers: Essential for sauces, dips, and condiments stored separately
Compartmented containers help with macro tracking. When you can see exactly how much protein, carbs, and fats you’re eating, staying on track becomes automatic. These work especially well for building balanced plates.
Buy containers in sets of at least seven if you’re prepping for a full week. You’ll need one for each day, plus extras for when some are in the dishwasher.
The Leak-Proof Test Every Container Must Pass
A container isn’t truly meal prep ready until it passes the upside-down shake test. Fill it with water, seal the lid, flip it upside down, and shake vigorously for 30 seconds.
Any leaks? That container fails.
This matters more than you think. Sauce-based meals like stir-fries or curry need containers with silicone gaskets in the lid. The gasket creates a watertight seal that regular snap-on lids can’t match.
Look for these leak-proof features:
- Silicone or rubber gasket around the entire lid perimeter
- Four-point locking clips (one on each side)
- Raised rim on the container that the lid presses into
- Vent that can be completely sealed when not in use
Containers without proper seals leak in your bag, create messes in your fridge, and let air in that spoils your food faster. Don’t compromise on this feature.
Stackability Saves Fridge Space and Your Sanity
You prep five days of meals. That’s at least five containers, probably more if you separate components. Where does it all go?
Stackable containers with flat lids are non-negotiable. Rounded or domed lids waste vertical space and create wobbly towers that collapse when you’re trying to grab Tuesday’s lunch.
The best meal prep containers nest inside each other when empty. This saves massive amounts of cabinet space. Instead of a messy pile of mismatched containers, you have one neat stack.
Uniform sizing matters here. When all your containers are the same dimensions, they stack perfectly. Mix-and-match container collections look chaotic and take up more room than necessary.
Clear containers let you see what’s inside without opening them. This reduces the number of times you expose food to air and helps you grab the right meal without searching.
Freezer-Safe Features for Long-Term Meal Storage
Not every container handles freezing well. Cheap plastic cracks. Thin glass shatters. Regular containers let in freezer burn.
Freezer-safe containers need thicker walls to handle expansion. When food freezes, it expands. Containers that can’t accommodate this expansion either crack or pop their lids off.
Leave headspace when freezing liquids. Fill containers only to the fill line (usually about 3/4 full). This prevents the lid from popping off as the contents expand.
| Container Type | Freezer Performance | Best For |
|---|---|---|
| Tempered glass | Excellent, no cracking | Soups, stews, casseroles |
| Thick polypropylene | Good, may warp over time | Solid foods, dry items |
| Thin plastic | Poor, cracks easily | Not recommended for freezer |
| Silicone | Excellent, very flexible | Portions you’ll pop out frozen |
Label everything with the date and contents. Frozen meals all look the same after a few weeks. Use freezer-safe labels or a permanent marker directly on the container.
Thaw frozen meals in the fridge overnight, not on the counter. This prevents bacterial growth in the outer layers while the center is still frozen.
Microwave-Safe Doesn’t Always Mean What You Think
That “microwave-safe” label? It only means the container won’t melt or release harmful chemicals at normal microwave temperatures. It doesn’t mean the container will heat your food evenly or that the seal will stay intact.
Glass heats more uniformly than plastic. Plastic containers often create hot spots and cold zones, especially in dense foods like high-protein meals.
Always vent containers before microwaving. Even containers with built-in vents need the vent opened. Sealed containers can explode from steam pressure buildup.
Remove the lid completely for best results. This prevents steam from getting trapped against the lid and dripping back onto your food, making everything soggy.
Some foods reheat better than others in containers. Rice, pasta, and grain-based meals do well. Crispy items like sheet pan dinners need the oven or air fryer to regain texture.
Common Container Mistakes That Ruin Your Meal Prep
You’re doing everything right with your cooking, but these storage mistakes are sabotaging your efforts.
Mistake 1: Storing hot food in sealed containers
Let food cool to room temperature first. Hot food creates steam, which turns into condensation when it hits the cold lid. That moisture breeds bacteria and makes everything soggy.
Mistake 2: Overfilling containers
Leave at least half an inch of space at the top. Overfilled containers can’t seal properly. The food pushes against the lid, breaking the airtight seal.
Mistake 3: Mixing wet and dry components
Store dressings, sauces, and wet ingredients separately until you’re ready to eat. Even the best containers can’t prevent soggy salads when wet ingredients sit on lettuce for days.
Mistake 4: Using damaged containers
Cracked containers, warped lids, or missing gaskets all compromise freshness. Replace containers as soon as they show wear. A $5 container isn’t worth losing $30 worth of prepped food.
Mistake 5: Not organizing by eat date
Put Sunday’s prep in the back, Monday’s meals in front. This rotation system ensures you eat the oldest food first and prevents forgotten containers from going bad.
How to Actually Clean and Maintain Your Containers
Proper care extends container life and prevents odor buildup. Most people don’t clean their containers thoroughly enough.
Wash containers within 24 hours of emptying them. Old food residue hardens and becomes nearly impossible to remove. It also creates a film that prevents proper sealing.
For stubborn stains and odors:
- Fill the container with warm water
- Add two tablespoons of baking soda
- Let it sit overnight
- Scrub with a non-abrasive sponge
- Rinse thoroughly and air dry completely
Never put containers away wet. Trapped moisture creates mildew and odors. Let lids and containers air dry separately before stacking.
Check gaskets regularly for food particles. These rubber seals trap tiny bits of food that rot and smell. Remove the gasket, wash it separately, and dry it completely before putting it back.
Replace gaskets annually even if they look fine. Rubber degrades over time, and a worn gasket won’t seal properly no matter how clean it is.
Top-rack dishwasher placement protects plastic containers from warping. The heating element on the bottom can melt or deform plastic. Glass can go anywhere.
Organizing Your Container Collection for Maximum Efficiency
A disorganized container collection wastes time and space. Set up a system that makes meal prep faster.
Store containers and lids separately. Stack all containers by size in one area. Keep all lids together in a separate drawer or bin. This prevents the frustrating hunt for matching pieces.
Nest same-size containers inside each other. A set of five 32 oz containers takes up the same space as one when nested properly.
Keep your most-used sizes at eye level. If you prep five days of lunches every week, those lunch containers should be easiest to reach.
Dedicate one shelf in your fridge to prepped meals. This keeps everything together and prevents containers from getting lost behind condiment bottles.
Use a permanent marker to label lids with portion sizes. When you’re in a hurry, you can grab the right container without checking measurements.
Budget-Friendly Container Buying Strategy
You don’t need to spend $200 on containers to meal prep successfully. Smart buying gets you quality without breaking the bank.
Start with a basic set of seven 32 oz containers. This covers your main meals for a week. Add specialty sizes as you identify specific needs.
Buy sets instead of individual containers. Per-unit cost drops significantly when you buy a 10-pack versus individual containers.
Watch for sales after New Year’s and in late summer. Container manufacturers discount heavily during these periods when people are focused on health goals.
Thrift stores often have brand-name glass containers for a fraction of retail price. Check that lids seal properly and there are no cracks.
Avoid ultra-cheap containers from dollar stores. They rarely last more than a few weeks and don’t seal well enough to keep food fresh. Spending $3 per container instead of $1 saves money long-term.
When to Replace Your Containers
Containers don’t last forever. Using worn-out containers compromises food safety and freshness.
Replace containers immediately if you notice:
- Cracks or chips in glass
- Warping or melting in plastic
- Staining that won’t come out (indicates material breakdown)
- Lids that no longer snap securely
- Missing or damaged gaskets
- Persistent odors that won’t wash away
Most quality containers last 2-3 years with regular use. Glass containers often last longer, sometimes 5+ years if you don’t drop them.
Rotate your collection. Don’t use the same five containers every week while ten others sit unused. Even wear extends the life of your entire collection.
Making Your Containers Work Harder for Your Goals
The right containers do more than store food. They help you hit your nutrition targets and stay consistent with healthy eating.
Compartmented containers make macro tracking visual. When you can see that your protein portion is smaller than your carbs, you can adjust before you even start eating. This visual feedback helps with calculating and hitting your macros.
Uniform portions prevent overeating. When every container holds the same amount, you’re not accidentally eating 600 calories one day and 400 the next. Consistency matters for results.
Separate containers for different meal types create structure. Use square containers for lunches, round for dinners, and rectangular for breakfasts. This visual system makes grabbing the right meal automatic.
Small containers for post-workout snacks keep you from overpacking. When the container only holds one portion, you can’t accidentally eat two.
Your Container System Should Support Your Life
The best meal prep containers are the ones you’ll actually use every single week. They fit your fridge, match your lifestyle, and make healthy eating easier instead of harder.
Start with the basics. Get seven solid containers that seal well and fit your typical meal size. Add specialty containers as you identify specific needs. Don’t overthink it.
Your containers are tools, not decorations. They should work hard for you, keeping food fresh, preventing leaks, and making it simple to grab healthy meals when you’re rushed. When your storage system is dialed in, sticking to your nutrition plan becomes the path of least resistance. That’s when real progress happens.